Building on my prior post I'll walk you through adding a blog with at least a single picture or many pictures in a newspaper style layout.
In my last post I showed you how to make a basic blog entry.
The steps are essentially the same.
- Log into Blogger
- Select "New Post" beneath the title of the blog that you want to post to
- Enter the title and post text that you would like to include
Now you can add one or more pictures to make your blog post more interesting.
I the tool bar just above the body of the post, you'll see an image icon 3 buttons from the right: 
A pop-up dialogue will appear that gives you some options on how your image will be inserted:
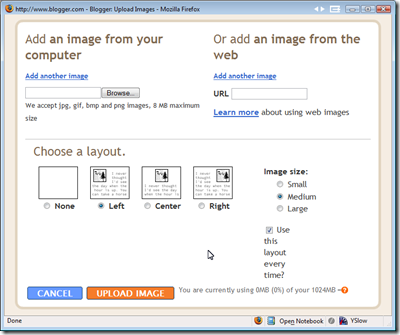
First, you'll notice that you can select an image from either you local machine or one that's already out on the web.
If you choose one from your machine, the image will be put on one of BlogSpot's servers so that it can always display your picture whenever your post is looked at.
If you choose to link to an image from the web, it is possible that the image won't be available if the originating server is down or removes that picture.
If you have rights to the picture, then I would recommend putting the picture on BlogSpot's server so that you can be sure your post displays correctly.
Second, you can choose the way your image lays out. Either Left, Center, Right, or None. You can also determine relative size of the image Small, Medium or Large.
You can upload as many images as you want, however, you'll want to be careful as to the amount of space you have available to store pictures.
At the bottom next to the "Upload Image" button, you'll see some text of how much space you're currently using as well as your max space allotted. So you'll not want to upload large high resolution maps of the cosmos or an image of every grain of sand on a particular beach you like.
Also, most digital cameras now-a-days take images in a much higher resolution than you would want to display on a web page. I recommend resizing your images on your local machine to sizes below 600x400 pixels. This size is plenty large enough for blog entries. You can always link to a larger version of the image stored somewhere else. This is a more advanced thing to do, so I may cover it a later date, if I have enough people wanting it.
You'll also see a checkbox for "Use this layout every time?". If you select this, the settings you pick this time will be your default options. If you post regularly and have a size or layout position that you like, this will save some time. Otherwise, feel free to mix it up a little.
If you choose to do more than one image at a time for upload, the layout choices will apply to all of the images. For example, if you chose "Center" and medium for 3 pictures that you want to upload, you'll get 3 medium sized pictures centered in a row.
For this reason you may want to upload an image, add text, and upload another image, so on and so forth. You may also want to vary the positioning of the image for variety, but that's mostly a matter of taste.
Third, click the "Upload Image" button.
The only really good way to see how your post will look with you image is to push it up (unless you use a 3rd party tool like Windows Live Writer) and see how it flows with the words.
Back at the entry edit page you can click on the "Preview" link in the tool bar and see what it will really look like in the browser you're using.
Keep in mind that different browsers, though theoretically standards compliant, will render things a little bit differently. So, the simpler you can keep you layout, the more likely your post will look good in more browsers.
Also, the way the image is laid out and sized is encoded into the html or web layout code. If you don't like the way the image appears in your blog, you can do one of 2 things:
- You can delete the image and try uploading it again with different layout and size settings
- You can click on the "Edit Html" link in the tab next to "Compose"
Depending on your comfort level with looking at code, the fast way to change things is using option #2. You'll want to be somewhat careful about what you change, as it make have some interesting effects your blog display.
It is certainly not a bad idea to delete the image and try again, if you want to ensure that the blog displays correctly.
That's the way you add an image to liven up your post. Next post I show you how to add a video.